


Key Manager| Managing API Keys for you | Role Based Ratelimts


Sharing API access with your customers requires a lot of work. You have to
Generate secure random API keys
Safely store those API Keys (by hashing)
Enforce ratelimits for your API's
If your product becomes popular then a lot of customers will require increased (or custom) ratelimits for your API's. Key Manager will take care of all that complexity for you simply and intuitively using role-based ratelimits.
Important Links
Demo Repo
You can clone this repo which has typescript and @niveth/key-manager packager integrated. All you have to do is to create an account at key-manager.nivekithan.com, get Root API Key copy that to .env file under the varaible KEY_MANAGER_ROOOT_API_KEY .
That's it then you can play around with sdk
gh repo clone nivekithan/key-manager-example-app
cd key-manager-example-app
pnpm i
pnpm run dev
Project Details
This project contains four parts
Application (Backend which accepts requests and verifies API Key)
Typescript/JavascriptSDK for interacting with our ApplicationAdmin panel for generating
Root API keyand generating and editing API keys through GUIDocs for documentation of our SDK and rest API (coming soon)
Tech Stack
Application
There are 4 main parts to our application
Generating secure and random API keys
Hashing and storing API keys
Verifying the API key is valid
Ratelimiting API key
Generating secure and random API Keys
We will be generating 36 bytes API Keys. so let's initialize a Uint8Array of length 36 and fill it will random values.
const buf = new Uint8Array(36);
crypto.getRandomValues(buf);
Now we got a buf of 36 bytes filled with random numbers but we can't send these numbers to users as API key.
We will have to convert those numbers to human-readable form. This can be done by converting those numbers to base58.
We are choosing to encode our API keys in base58 instead of base64 because base64 includes characters like + , / which you don't usually see in API Keys.
To convert our buf to base58 we will be using baseX from base-x npm package.
import baseX from "base-x";

function base58(buf: Uint8Array) {
  const alphabet = "123456789ABCDEFGHJKLMNPQRSTUVWXYZabcdefghijkmnopqrstuvwxyz";
  return baseX(alphabet).encode(buf);
}

const buf = new Uint8Array(36);
crypto.getRandomValues(buf);

const apiKey = base58(buf);
That's how we generate a secure and random API Key.
Hashing and storing API Keys
Just like passwords we should not store API keys in plain text. Instead, we should always hash the API keys and then store that result. This means even if an attacker gets access to our database, the API keys will be secured.
For hashing we use sha-256 algorithm and then store the result in the database by encoding it in base64.
async function hashAPIKey(apiKey: string) {
  const hashOfKey = await crypto.subtle.digest(
    "sha-256",
    new TextEncoder().encode(apiKey + SALT)
  );

  const bytes = Buffer.from(hashOfKey);
  return { hash: bytes.toString("base64"), salt: SALT };
}
Verifying the API Key is valid
Verifying API Key is much similar to the previous process. First, we will hash the incoming API key with the same algorithm and salt. Then we will compare the result with the database to find other API key with the same hash.
If we found one, then the incoming API Key is valid otherwise it is not valid.
Rate limiting API key
We support role based ratelimts and we have not yet introduced roles in key manager to you, therefore we will discuss this in the later part of a blog post or checkout the documentation for verifyUserAPIKey
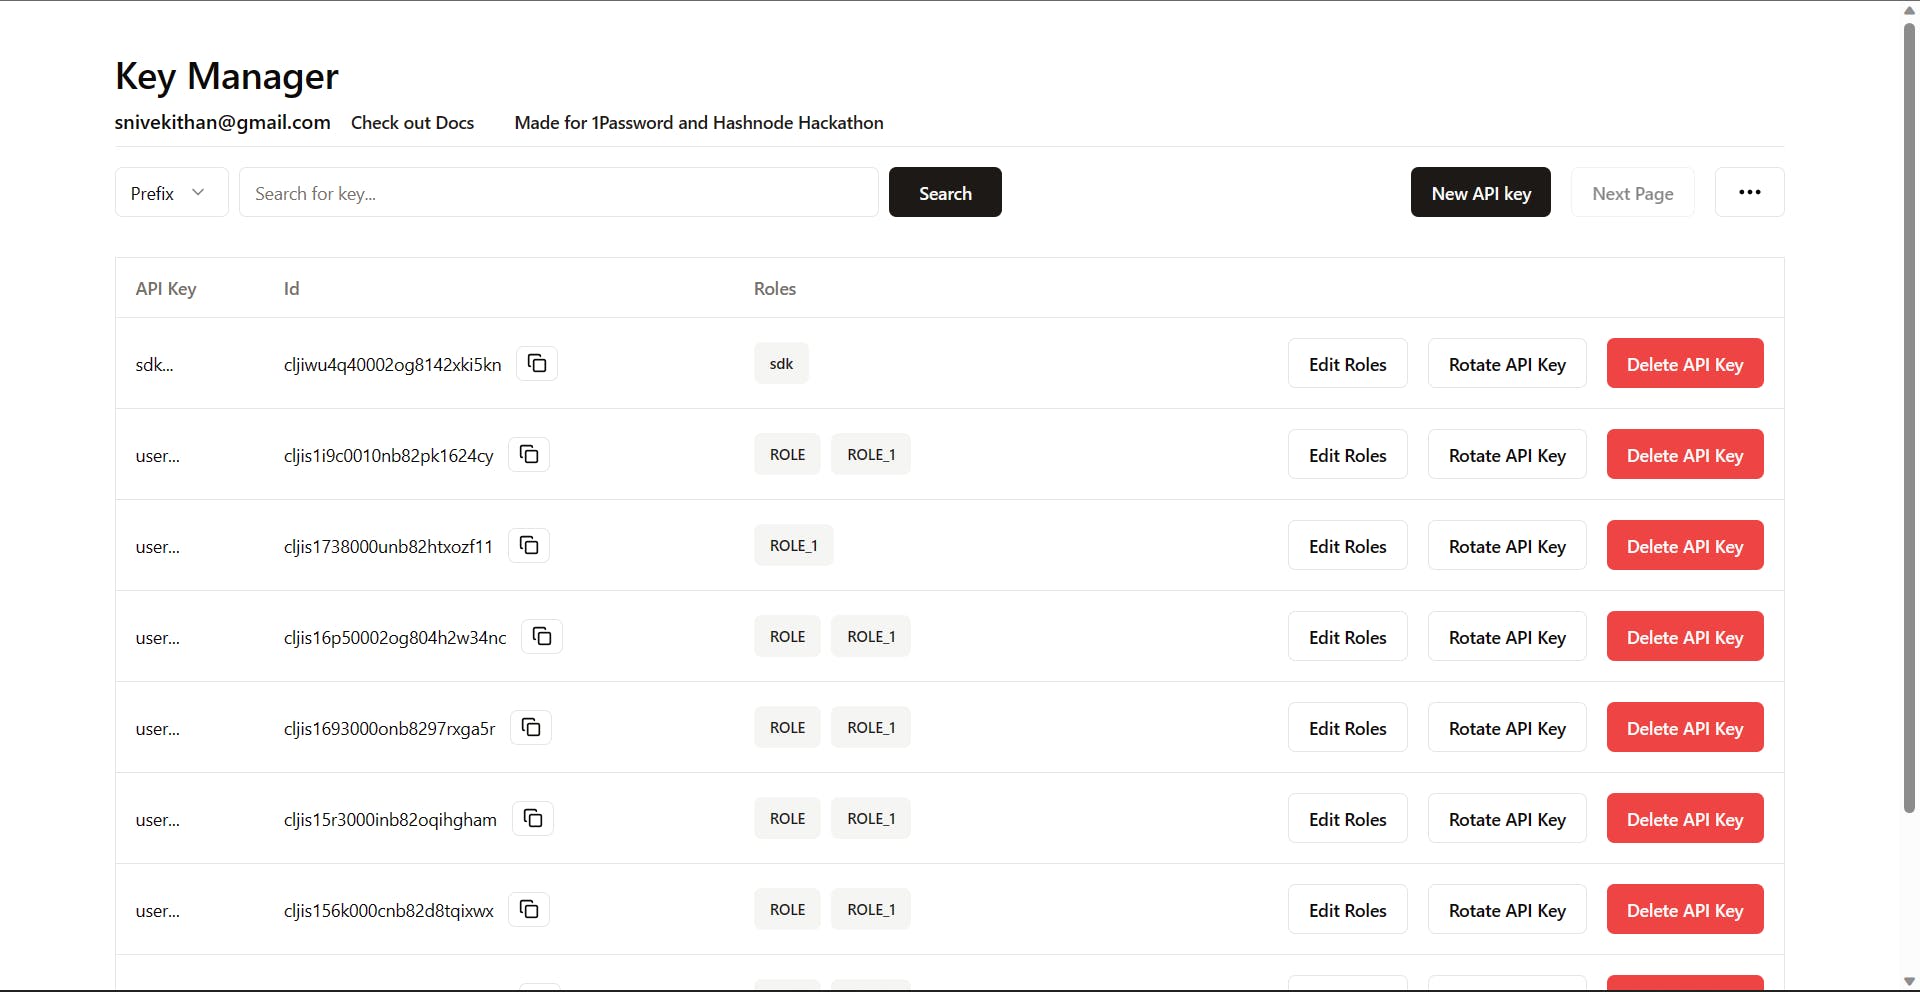
Building Admin panel
The main way to access key manager is either through our sdk or rest API. The only reason you should ever need to open admin panel is either to get Root API Key or regenerate Root API Key.
But that's the ideal case, you will have a any number of scenario where you need to open an admin panel for generating or editing API keys. Maybe you need to rotate a compromised API key, maybe you need to set a custom ratelimit just for one of your customers urgently.
Our admin panel is a simple remix application, authenticated by passage.
It supports the following features
Regenerating
Root API keySearching and filtering API keys
Creating new API Keys
Editing roles of API keys
Rotating API Keys
Deleting API Keys
Authentication
For getting the Root API token you have to sign in to our admin panel. This makes it important for us to properly authenticate it. Since under any circumstances, we should not leak Root API Token. This is where Passage by 1Password shines, passwords can be leaked but not biometrics.
Integrating Passage to remix is quite easy all we have to do is add a <script /> tag in root.tsx
export default function App() {
  return (
    <html lang="en">
      <head>
        <meta charSet="utf-8" />
        <meta name="viewport" content="width=device-width,initial-scale=1" />
        <Meta />
        <Links />
      </head>
      <body>
        <Outlet />
        <Toaster />
        <ScrollRestoration />
        <script src="https://psg.so/web.js"></script>
        <Scripts />
        <LiveReload />
      </body>
    </html>
  );
}
Then create a new route called passage. This can be done by creating a file called passage.tsx under routes folder with contents
import { getUserId } from "@/lib/auth.server";
import { redirect, type LoaderArgs } from "@remix-run/node";

export async function loader({ request }: LoaderArgs) {
  const userId = await getUserId(request);

  if (userId) {
    return redirect("/admin");
  }

  return null;
}

export default function PassageRegisterPage() {
  return (
    <main className="min-h-screen grid place-items-center">
      {/** @ts-ignore */}
      <passage-auth app-id="vZBRPwrrCa32l5KaYhSyUTzn"></passage-auth>
    </main>
  );
}
Whenever the user lands on this page (/passage) first, we will check whether the user is signed in or not. If the user is signed in then we will redirect them to /admin page where our admin panel lives.
If the user is not signed in then we will render <passage-auth /> component.
To check whether the user is signed in or not we use passage.authenticateRequestWithHeader function
export async function getUserId(
  request: Request,
  retry: boolean = true
): Promise<string | null> {
  try {
    const cookieHeader = request.headers.get("cookie");

    if (!cookieHeader) {
      return null;
    }

    const cookieKeyValue = cookie.parse(cookieHeader);
    const userId = await passage.authenticateRequestWithHeader({
      cookies: cookieKeyValue,
      headers: { authorization: `Bearer ${cookieKeyValue.psg_auth_token}` },
    });

    return userId;
  } catch (err) {
    console.log({ err, retry });
    if (retry) {
      await new Promise((r) => setTimeout(r, 1_000));

      const userId = await getUserId(request, false).catch((err) => ({
        error: true,
        err,
      }));

      if (typeof userId !== "string") {
        console.log({ error: userId?.err, retry: false });
        return null;
      }

      return userId;
    }

    return null;
  }
}
If you check the above code, you can see that if authentication request fails for the first time we retry it again after 1 second. This is because while I was developing I saw that even after logging in through passage, I was getting an error that Auth Token is invalid but if I retried the same request after 1 second there was no error.
So I assumed there must be some very minor delay for new auth_token to get valid, therefore I have implemented this retry functionality.
Typescript/Javascript SDK
Installation
You can install our sdk by running the command
pnpm i @niveth/key-manager
Our sdk ships with typescript definition out of the box and supports esm, cjs modules.
Getting started
You can initialize the key-manager using initKeyManager function exported from sdk.
import { initKeyManager } from "@niveth/key-manager";

export const {
  verifyUserAPIKey,
  createUserAPIKey,
  addRoles,
  deleteUserAPIKey,
  removeRoles,
  rotateUserAPIKey,
} = initKeyManager({
  rootAPIKey: process.env.KEY_MANAGER_ROOT_KEY,
  endpoints: {
    CREATE_USER: {
      default: { duration: 60_000, maxReq: 100 },
      roles: {
        PRO: { duration: 60_000, maxReq: 1000 },
        TEAM: { duration: 60_000, maxReq: 5000 },
      },
    },
  },
});
As you can see from the above example initKeyManager takes rootAPIKey which you can generate from the admin panel and it also defines the endpoints and their ratelimits.
The above code defines an endpoint with the name "CREATE_USER" which by default has ratelimit of 100 Request per 1min. If the API Key has the role of PRO or TEAM then the ratelimit will 1000 Request or 5000 Request per 1min respectively.
initKeyManager
It returns following methods
createUserAPIKey- GenerateAPI keyfor your usersrotateUserAPIKey- RotateAPI keyof your usersverifyUserAPIKey- Verfies theAPI keyis valid and returns its ratelimit statusdeleteUserAPIKey- Deletes theAPI keyaddRoles- Add roles to theAPI keyremoveRoles- Removes roles from theAPI key
For more detailed documentation check out the docs website.
Building SDK and publishing to npm
I have never built a library let alone published it to npm. So it's quite challenging to get everything right (I hope) when you are doing it for the first time. There are a lot of steps you have to do like
Set up typescript properly
Emit proper
.jsand.d.ts.filesEmit
ejsandcjsmodulesConfigure
package.jsonproperly so thatnpmcan identify all these things.
Luckily I came across an amazing tool called dnt it allows you to write code in deno and it automatically generates all those above things. The only limitation here is that I have to write code in Deno which means I can't use npm core packages. This is not a problem since my sdk has only one dependency which is fetch API. Since Deno and nodejs support it. It was a no brainer for me to author my package in Deno and publish it npm
Documentation Website
It is built using Docusaurus and deployed using cloudflare pages. You can check the live version at https://docs-key-manager.nivekithan.com/
Right now documentation is there only for SDK, for rest api I will add it soon.
Deployment
Right now remix application, postgres and redis all have been deployed at Singapore region. As a result, latency between the application is very low but if you are making request from another part of the world then the latency between you and the application might be higher.
Not only that the machines all postgres, redis, remix application deployed under free plan therefore the compute capacity is low.